User Guide
This describes the features of the “DLS Manager”, the main client app of DLS. It can be found on the desktop or in the client folder of the install directory as DLS.Manager.exe. If something doesn’t work, please report an issue.
Contents
- Select Project
- Source - Target Flow
- Overview Screen
- Search
- Data Sources
- Warnings
- Model Update
- Business Dictionary
Select Project
If you haven’t created a project yet, you need to first configure one - see this section in the installation guide.
After you’ve configured your project, it will show up in the project list after launching the client. Alternatively, you can go to Project > Open to switch between projects.

Source - Target Flow
This is one of the most useful tools of DLS. You start by selecting the part of your solution from which and to which you want to explore the lineage. The app then lists all the dataflow connections that were found going from the source componnet (e.g. the stage database) to the destination (e.g. a Power BI Report). This way you can find all the lineage that leads to the report.
Selection
For example, this selection would find all the data flows leading from SampleDSA to Report1.

Conversely, if you want to find all the uses of the SampleDSA.CPS.address table in SSAS model, you caould use this selection to perform impact analysis.
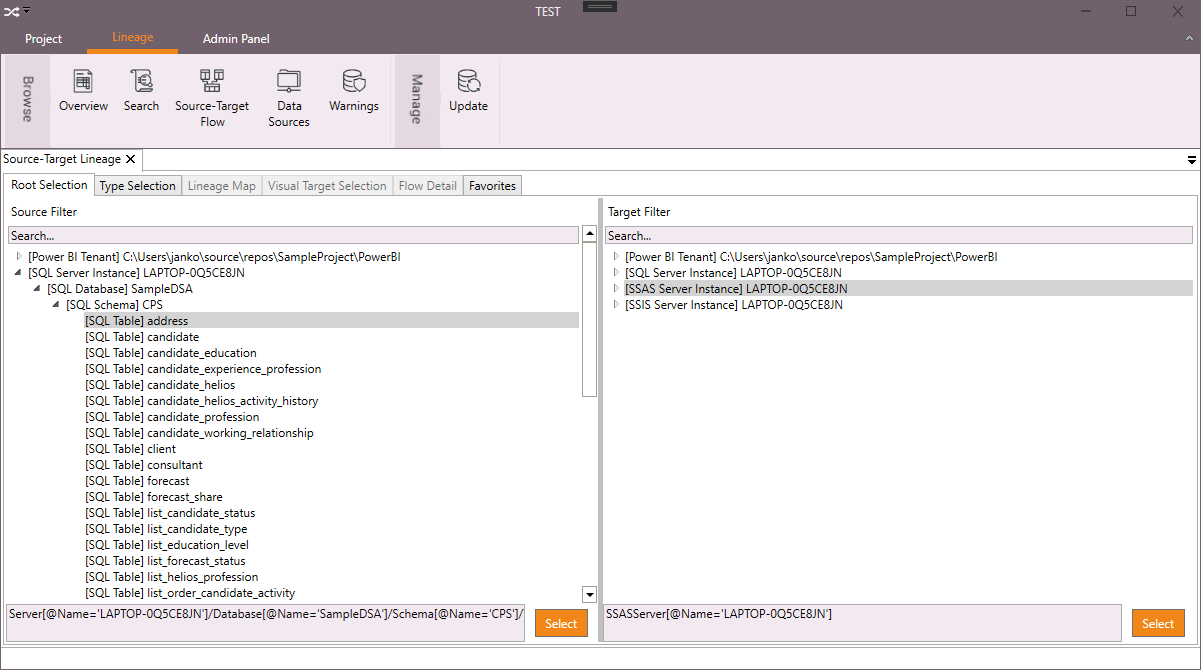
Or you can just select the whole soure DB and target DB to view all the lineage between the 2…depends on what you need.
You’ve noticed that the source-target panel has multiple tabs - Root Selection, Type Selection, Lineage Map and others. The idea is that you make you way from left to right: selecting the source and target root sets the boundaries for the lineage search. That enables the Type Selection tab.
Now in the Type Selection tab you pick the type of objects between which the lineage is to be searched. For example, if you selected a SQL database as the source, you could be interested in source tables, views or columns (in both tables and views). So to set the detail level you want to view.

Lineage Map
After you have selected the source roor and target and the obejct types to tract, the Lineage Map will be enabled:

The lineage map lists the data flows that were found based on the source and target selection. When you click on a line in the table, the Flow Detail tab will be enabled, where you can see the details of the flow.
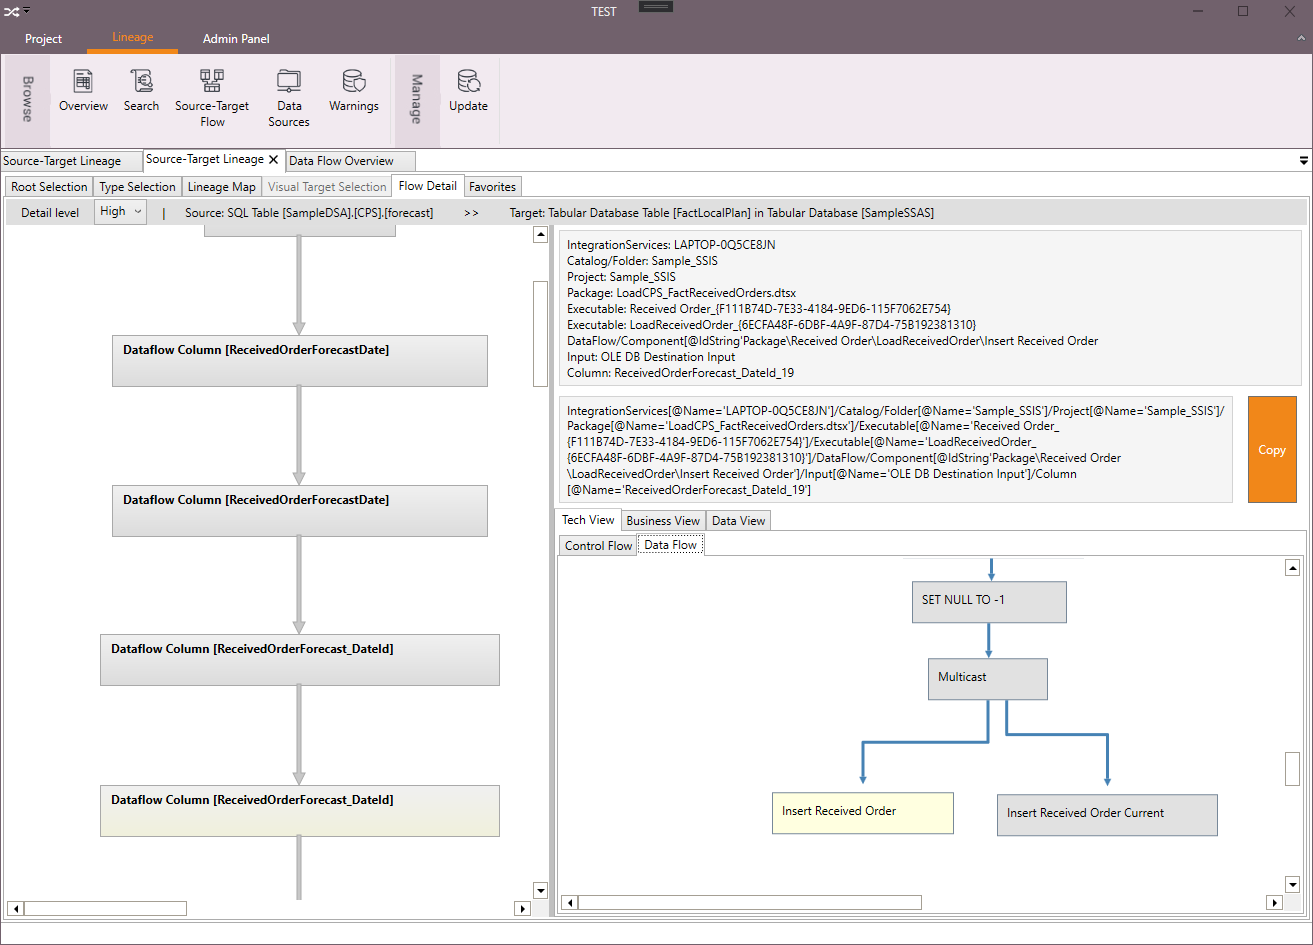
Flow Detail

The flow detail shows ste steps that lead from the source to destination. You can select the nodes on the left to view their detail. You can also rearrange the steps by dragging them.
Note the Detail level dropdown in the top left corner. In our example, we were looking for data flow between SQL tables and tabular model tables. That’s on the medium level of detail. However, you can switch to the High detail level, which shows the column detail level:

Element View
By element view, we mean the right side of the Flow Detail tab. You will also see this view elsewhere, for example in search results. The top of this view shows the location of the element you are viewing. Below that, there are tree tabs:
- Tech View
- Business View
- Data View
The tech view shows the SQL code of the selected element. If it’s a part of a script, the concerned part will be highlighted, as seen above. The tech view adapts to the different types of elements. For example, for a SQL table it shows the table definition. For an SSIS package dataflow component, the tech view shows the package design, with the selected component highlighted:
The second tab, the Business View, enables you to add annotations to the elements. Here, the name and description for the SSIS package is filled.

These descriptive tags can help you build a knowledge base of the objects in you solution. By default, the Name and Description fields are available for all elements. You can create custom fields and define where they will be used in the Admin Panel (see Business Dictionary). Once there, you can also define business links. These links could be used to create a reference to an object that does not have a technical data lineage connection to this element, but is related to this object from the business logic point of view:

When adding a business link, you need to first select the type of link to add (which first needs to be created in the Admin Panel). You then have to locate the element you want to link to. This uses the Search module.
Overview Screen
The Overview screen in the Lineage tab provides a quick glance at what data flows have been found. It does not, though, go into any further detail. You can use other options from the Lineage menu for that.

Search
DLS indexes all elements based on their name, as well as the annotations associated with it (entered in the Business View of the Element View). You open the search panel by clicking Lineage > Search and then you can simply type what you are looking for and press Enter.
If you are getting too many results, you can expand the Filters and try limiting the results to a set of object types or a specific database / SSIS project:

Search Results

The search results are sorted by relevance. Double-clicking any of the results will point you to the element view of the selected item.
In this view, you can also right-click an element and display the lineage (incoming dataflow) / imapct (outgoing dataflow) of this object. If any such element is found, it will be added to the displayed graph:


You can the continue going through the lineage upstream / impact downstream from the added elements as needed. If there are too many steps in the data flow, try switching to a lower detail level in the top left corner.
Data Sources
This view lists the external data sources that were detected in the solution (if any). By external sources we mean databases or files from which this solution pulls data that are not part of the lineage model. For example, if you are using an Excel file as a source for the SSIS, the file is not parsed by DLS, but it’s detected when parsing the SSIS packages.

You can also expand the lines in the list to view the columns that were detected.
Warnings
This is a specific feature aimed at the cases when a change in the source systems can cause an issue in your SSIS dataflow. If the length of the source type is longer than the column in the SSIS dataflow, a truncation can occur, failing the dataflow. This view in DLS lists the SSIS packages where this kind of issue was detected.
Model Update
By clicking Update in the Lineage tab, you can refresh the entire lineage model based on current metadata from the somponents in your model. For more details, see the install guide.
Make sure you have sufficient permissions for extracting the metadata (when using Windows authentication),
Business Dictionary
In DLS Manager, the business dictionary is visible from the Business View tab in the Element View. The define the annotation fields and “business links”, use the Admin Panel.

While performing a model updte refreshes all metadata from the source systems, the annotations and links in the business dictionary stay in the model between updates and will be linked to the refreshed versions of the lineage model elements. In short, you won’t lose the business ditionary when you update the model. Tha would not be nice.
Fields
By default, two fields are enabled for all element types: Name and Description. To add or remove annotation fields, click Fields.
Views
Here you can select which fields are available for each element type.

Business Link Types
Here you can add or remove business link types, which can then be added to an element’s metadata from the Element View.